
10.1.1 Installation : SuiseCRM
System Requirements
PHP 5.6 and PHP 7.0, 7.1,7.2,7.3 (7.3 is recommended & 7.4 is not yet supported)
- MYSQL 5.1+
- mod_rewrite Apache
- MBString Extension
- GD Extension
- MYSQLi Extension
- PDO Extension
- OpenSSL Extension
- Zip Extension
- CURL Extension
- Cpanel, Virtualmin, Plexpanel, etc. We don’t support installations on bare VPS.
Create Database
You’ll need to set up a database to store all your data.
1. Click on “New” to create a new database.
2. Type in your database name. Remember the name you used, you’ll be needing it later. We’ll use “ciuis” for this demonstration.
3. Click on “Create”.

Click on the “Install Now” button to begin the Installation.

Check for Requirements.
1. Make sure all the dependencies are installed.
2. Click “Next” only if you see “Green Tick” beside all the dependencies.

Enter Credentials
1. Type in your Hostname.
2. Type in your Username. Default Username is set to “root”
3. Type in your Password. Default Password is set to “root”
4. Select the Database you created earlier. “ciuis” in the case of our example.
5. Check the box next to htaccess to give .htaccess.
6. Check the Dummy Data box to install the application with some example data. This may help you to understand the app better.
7. Click on Install.

Click on “Login”
1. Wait for a moment for the installation to complete.
2. Verify your login credentials.
3. Click on “Login” to be taken to the main login page.
Login
1. Enter the credentials you set earlier.
2. Choose Language.
3. Click on “Login”.

4. Congratulations! You have successfully logged into CiuisCRM.

Installation Video
Configure database connection

You need to have previously setup database from the cPanel.
Here is a good tutorial on how to setup MySQL database in cPanel if you are not familiar with this.
- Login to cPanel by accessing www.yourdomain.com/cpanel and navigate go MySQL Databases.
- Create database.
- Create user and setup your password.
- Add the user to the database by selecting the database and the username.
Make sure you have checked All privileges when adding the user to the database.
10.1.2 General Overview
1.2.1 Main screen
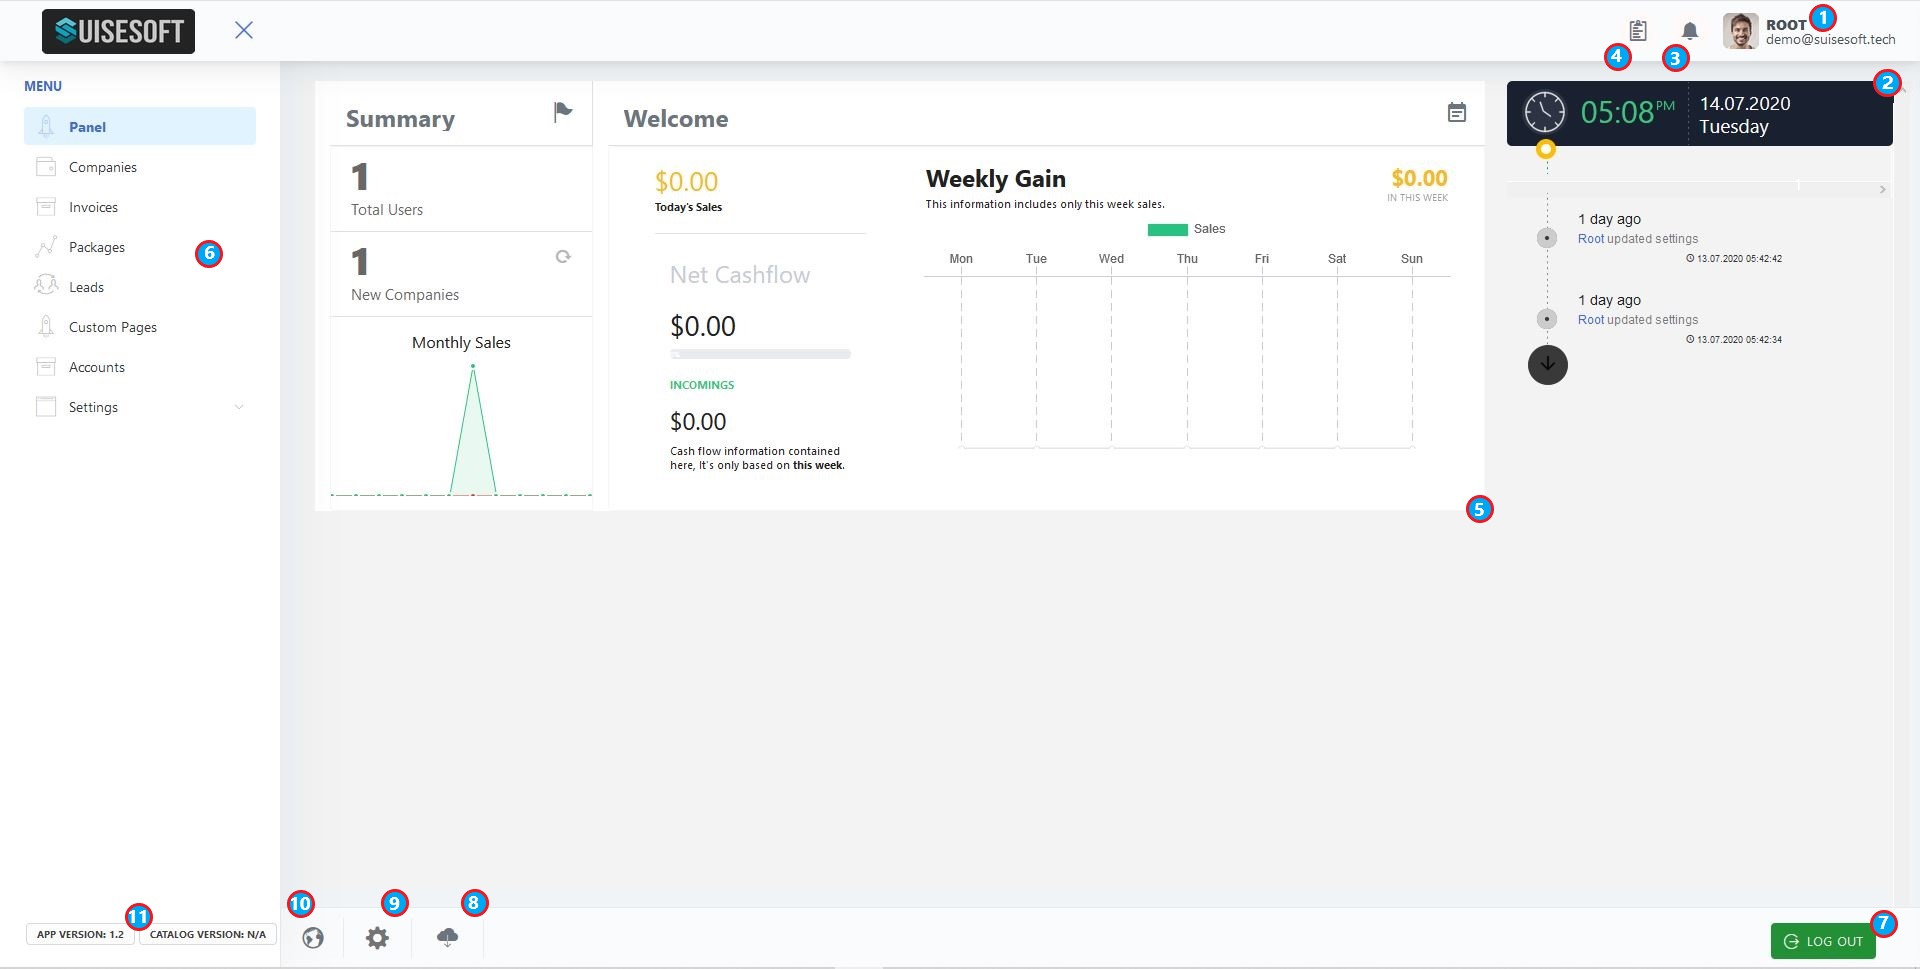
1 Shows your profile. You can chance your details, picture and password by clicking on your profile and clicking "PROFILE"
2 The right hand display shows recent updates as well as time and date
3 The bell icon gives you an overview of recent notifications by clicking on it
4 Clicking on the clip board icon gives you the option of creating a to do list
5 The main display shows you the most important statistics on your sales, customers etc.
6 The left hand panel shows the main menu with all options and functions you need for using SuiseCRM
7 Log-Out-Button
8 Clicking the cloud icon gives you the option to check for version updates of SuiseCRM
9 Clicking the gear icon opens a panel to customize the appearance of your copy of SuiseCRM to make it your own
10 The globe icon give you the option to select your language of choice
11 The bottom main panel displays your current version of SuiseCRM and changelog version
Please use the SuiseCRM Super Admin Documentation for further instructions.